Quantcast
Channel: Source @ Coveo
Viewing all 202 articles
Browse latest View live

Guidelines to configure effective hardware for Coveo

$
0
0

When configuring your servers, there are some aspects to consider. Depending on your needs, you will need to implement the most beneficial scalability model. We will be highlighting some options that can guide you along. The first aspect to consider is the amount of documents. You see, as the number of documents in your index increases, hosting the index on a single hard disk can often lead to size and performance limitations. In this scenario, consider adding a slice. The slice is in effect, a separate physical storage location for a section of the master index and distributes the index content, hence increasing available space. It’s possible that it can potentially speed indexing once you have passed a certain threshold, so add a slice when it’s needed. A slice can potentially contain up to 40million documents, and since one Coveo server can typically host up to two slices, it would then contain up to 80 million documents evenly distributed between the two. Potential problem averted!

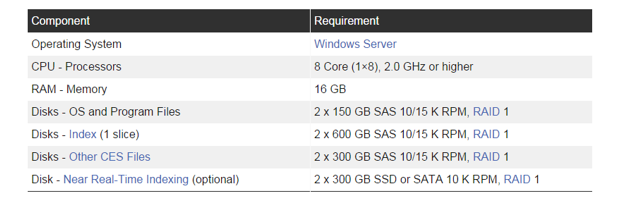
Memory and CPU levels, are other factors to keep in mind. To put it simply, the greater number of CPU cores, the better. In what exact situation should I add CPU cores, you might ask? Well, when you find your users entering queries with numerous terms, exact match operators or wildcard characters, high number of documents to convert and if you use the OCR module these operations are CPU dependent. So to give an example of a server with an index size between 5 to 20 million documents:

Server Index Size Example

Of course, the number of needed cores increase with the size of the index. Primarily, we are including physical memory in the equation, since indexing uses a lot of physical memory to pre-compute mappings. Querying your index also requires a great deal of physical memory for caching. Other examples are facet, string or numerical fields that have to be basically pre-loaded in memory. Simply put, the more memory CES has at its disposal, the faster the data in your index can be queried, your end users cannot query data in an unwritten transaction. The transaction is a unit of data that CES keeps in its memory until it’s written in the index, so if CES has 32GB of RAM available, it can commit larger transactions than if it had only 16GB. Often times, the need to ensure that queries and query loads can always be maintained and served will necessitate the addition of Mirrors as part of your infrastructure. This will essentially share the query bearing load and in the event that your main server is unavailable for any reason, you can immediately point the query serving server to the mirror, problem solved! Simply put, if the number of end user queries will potentially slow down your master server, add a mirror! Here’s a quick pic to illustrate how a mirror can help in a network that is well load-balanced:

load Balancer

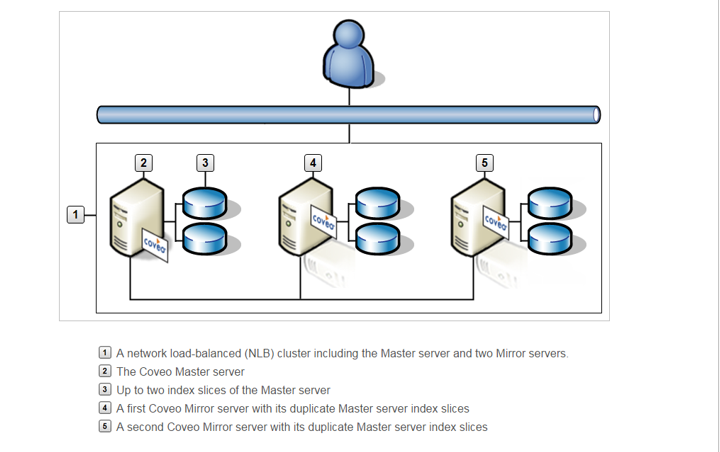
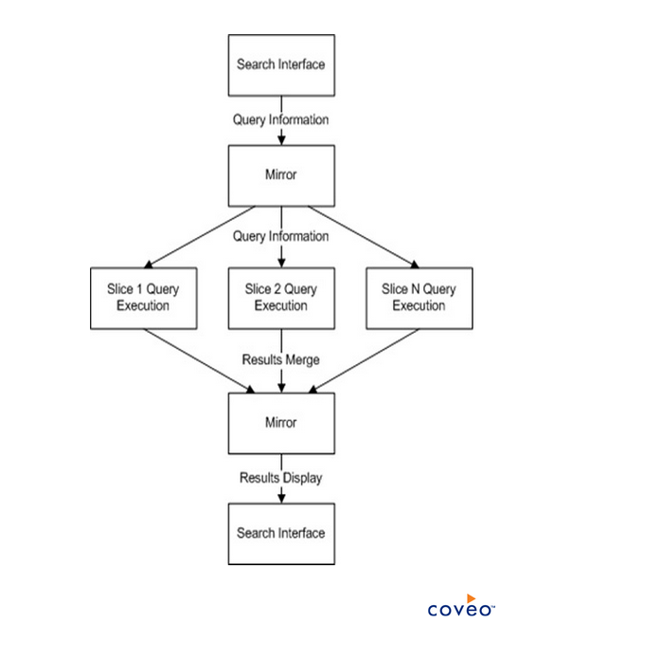
So you we can see, the master server is supported by two mirror servers already having slices configured. And for a fuller picture, check this out:

Indexing Pipeline

Now, CES is of course designed to function properly as long as its host server meets the minimum hardware requirements. So disk selection is important. The index should be installed on a dedicated hard disk. As an example, if your index documents occupy 1TB in various repositories, with such a mix of content type, the index size could end up at 42% of the original documents size (420 GB). The size of the dedicated index hard disk should at the very least be 500GB. We also recommend at least 1GB of available space to install the CES software on the system hard disk. Low latency on your disk is also important both for indexing and querying speed.

Another aspect that we’d like you to ponder, is the freshness of your index. This is also important to consider, giving that the index pipeline processing time may greatly vary depending on numerous factors such as the index size, the number of new documents to index at a given time, and the available resources on your Coveo Master and Mirror servers. Also, indexing can only go as fast as the crawled repository can feed us the documents. Hence, it’s possible that the bottleneck might not be CES-related. Near Real-Time indexing is a newer feature that improves the freshness of your index, thereby making new documents searchable faster. NRTI creates small temporary slices called subslices to receive new, changed, or deleted indexed documents. Because subslices are much smaller in size than a regular slice of a large index, their index pipeline processing is completed much faster, allowing to return queried documents they contain much faster. The feature kicks in by default when reaching a million documents. Look at the below table for recorded improvements:

NRTI

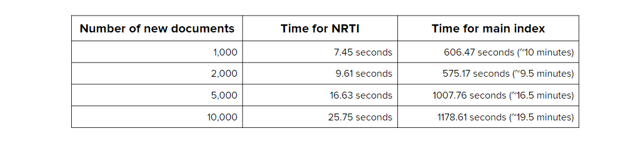
The table speaks for itself. Use NRTI at your leisure! A side note on this: When the Coveo server does not meet the requirements and large sources are rebuilt on top of a normal flow of new documents, the index pipeline processing time may prolong by a few days and enabling the NRTI feature will most likely not help because the server is lacking resources. So normal recommended practices should be applied in other for this feature to be truly effective. This feature has been enabled by default since the CES build 7.0.7022. Since NRTI is an I/O intensive process, to achieve optimal performance, we recommend the addition of one dedicated disk for the NRTI files on each Coveo server that are serving queries and point to that disk, and as always, the dedicated disk specifications depend on the size of your index as we had previously illustrated. With all these in mind, the Coveo support team is currently building a tool that will greatly aid you in determining on a case by case basis, what would be the best infrastructure to implement for CES to flourish. It promises to greatly help simply this potentially difficult task and avoid issues down the line. An upcoming blog will provide details. Stay tuned!


An award-worthy office visit!

$
0
0

The Why

We lately had Maps360 come to our office in Quebec to take pictures for Google Business View. Why you might ask.

We are a software company. We sell a series of bits ordered in a very specific manner. Our clients buy those well aligned bits and, to some extent, couldn’t care less about our offices.

But we also sell to another audience. Our bits aligner. We are constantly hiring in a competitive industry where there are far more jobs than people to fill them. We are a good place to work, with good conditions, and with a nice office. That last part is something that we thought we could leverage in our recruiting, and Google Business View comes in as the best option to show this off.

The How

With the help of Guy Couture from Maps360, we started preparing the whole visit. We quickly settled on using Morphsuits to have a common theme. A few days and 600$ later, we had our order in; almost all colors and a Power Ranger (but that was for the Christmas party; that’s another story).

From there we planned as many ideas as we could. There were some things we wanted to showcase. Donuts (a classic here whenever you break the build, leave your machine unlocked or else), our bean bags, our projectors and TVs, our shower, our swordsmanship skills, etc.

And then we got anything we could squeeze in as weird\funny\wut.

We also had our UX people prepare some slides with some of our perks and teams so we could have them on different screens throughout the shooting.

We improvised many things on the spot, but the preparation enabled us to have many things at hand; some big teddy bear, epic nerf gun battle, pictures of morphsuiters that couldn’t make it, a distributed-resource locking debate, a twister game, snow saucer to slide in the stairs with, alouette!

And then came the shooting time. We had our morph bunch, and many off camera helpers ensuring that the next shot was ready. If not, this would have taken much much more than the 4 hours it took. But, with great direction from our shooter and the team, after multiple awkward positions (my ribcage still hurts from that twister shot!), realising that the guy doing Movember should not be wearing the white suit, it was a wrap!

The Outcome

So. Did it pay off?

It’s probably the most fun we had with our clothes on… (hey, those count as clothes, right?). Seriously, we had a blast. So even if we weren’t going to hear a lot afterwards, we can still remember many things that happened “or did not happen” on that evening.

But we did hear about it. After it was online, it took less than a week for candidates to start mentioning it. So, kudos to everybody involved.

We certainly hope people will get even more interested to come work with us once they see our great offices - but we’ll know the impact in the coming months.

The Bonus

What we didn’t expect was to have gained more global visibility. Google gives a few awards each year for their Business View. Guy Couture from Maps360 submitted our visit for the 2014 awards.

We Won! - Most Creative Tour Award of 2014 - North America.

Awesome! We couldn’t have asked for anything more!

It’s a Wrap

I want to say some major thanks. To the awesome team that help prepare, stage and shoot the whole project. It took a large group of people over many hours. It would not have been possible to do it without you guys. And by far and large, the result would not have been this nice if it was not for all the fun we had. Also, to Guy from Maps360 that helped shape this vision from the start, and did a fantastic job of juggling with our multiple ideas to bring the whole thing into a sharp result.

Looking back, there is only one shot I think we should have added. A shot where Blond, Blue, Brown, Orange, Pink and White would be around a table debating the meaning of Madonna’s Like A Virgin.

With this being said, go take a look!

The tale of a programming contest - Part 2

$
0
0

Fifth edition

After months of preparation, the fifth edition of Coveo Blitz was held on January 10th 2015. This year, we held the contest in our offices for the third time. A total of 54 students from 7 universities and colleges participated in the fifth edition of our annual contest. Let me tell you a bit on how it went.

Contest creation process

We started working on Coveo Blitz 2015 in late March of 2014. The first step was to find people interested in working on the preparation of the contest among our employees. This was the easy part for Coveo, probably due to the fact that it’s not the first edition and people know what they are getting into.

Then, probably the most important task was to find the challenges the students would have to work on during the contest. This is where I always push to get the challenges more challenging. I admit, I’m the one who always thinks it’s going to be too easy. But boy, was I wrong this year!

After a few meetings of brainstorming on ideas around what we do (search engine, usage analytics, …), we decided to ask the students to provide an analytics engine on top of nearly 1 billion log lines of Apache web server. We wanted the engine to provide small metrics such as count by error code or access by country for a specific date range. But we also added a few more complex metrics such as the average response time, the max response time, and others.

The contest was divided in three different parts:

  1. GLORIOUS MAPREDUCER: a MapReduce component that crunches the data

  2. AWESOME SERVICE: a server that reads the crunched data and answers the queries our contest platform will submit

  3. MYSTERIOUS USER INTERFACE: an intuitive user interface that even the boss (that’s me!) can use

A team of ~15 persons was assembled to build all the components, documentation, test data and a bunch of other stuff required for the contest. It took a lot of hours, lunches, dinners, coffees and stubbornness to get it all ready for the day of the contest, and we succeeded.

Every year, we somehow underestimate the cost of modifying our contest platform for the new challenges. This year, adding support for Amazon Elastic MapReduce (EMR) proved to be more complex than we anticipated.

Part of the Coveo team working on preparing the contest in late December

D-Day

We can already feel the vibe the Friday before the contest. The team is working on finalizing the latest details, such as setting up the R&D area for the contestants and the ops team, setting up the projectors or simply rewriting the scoring algorithms. After turning off the lights for the night, it’s time for the traditional Poutine, just before bed.

The day of the contest starts early for the team (and most likely for the students as well). I got at the office at around 6:10 am and there was already a team of student preparing their gears for the contest - probably a record. But others decide to be late - usually veterans - and find original places to hang their coats:

We like to think this is one of the best contest for students in the area and we are working hard to keep it that way. One of the things we did this year, with the help of our Amazon account executive who sponsored the event (thanks James), was to provide a $50 credit for Amazon AWS to all participating teams. The idea was to provide as much tools as possible for the teams to be ready for the contest. One month prior the contest we sent an email to all teams with the credit and a text explaining they should use the credit to try out EMR, not mine Bitcoin!

During the presentation of the contest and its multiple challenges, I asked how many people played with EMR and a total of 6 persons raised their hands - ouch! I think the students underestimated the complexity of Coveo Blitz and the fact that being prepared helps. And we underestimated the fact that students are students.

When the programming contest is too complex

The day was divided into 5 evaluation steps, with each of them adding complexity. Remember I said 1 billion log lines, well, we kind of lowered that number because of the time it took to crunch that amount of data. The first evaluation consisted of only 100 log lines and up to 12.5 million log lines for the last evaluation.

After the first two evaluations, not a single team had points! The Coveo team was running around helping the students with the GLORIOUS MAPREDUCER - we even did a quick crash course to help them.

We were still hoping for some teams to make points on the third evaluation as we were monitoring the teams testing their algorithms with the test data provided. But after the third round when no one scored a single point we had to readjust the contest.

We gave the source code of the GLORIOUS MAPREDUCER for the first evaluation round to everyone. We also decided to rerun the first three rounds in place of the fourth one. We finally got a team scoring points on our super Mario Kart dashboard. You can see it here.

I admit it, the contest was too complex this year and I am certainly a bit responsible for this.

Some tricks for next year

I have a few advices for people who wants to participate in Coveo Blitz, or any other contest.

  1. Be prepared
    Every year we can see the difference between the teams that spent time to prepare for the contest compared to the ones who did not. The ones who prepared already have the tools they want to used installed on their computer and pretty much know the role of each people in the team. That makes a big difference when you have a limited time to complete the challenges. You’ll have a lot more fun that way, I’m sure!

  2. Know the basics
    Every year we see students choosing the language they want to use, installing the featured components and reading the how-to. Again, this goes to #1, be prepared. You should know your tools and languages if you want to perform in the contest.

  3. Have someone dedicated to the UI
    Coveo Blitz always has a user interface part and every year is the same - most teams do not put the required efforts to have nice user interfaces. It still counts for 25% of the points, at least it was in the last editions of Coveo Blitz.

  4. Set small, incremental goals during the day
    This is crucial to achieving results. You’re a team and you need to sync often, and make sure you’re all working in the same direction.

During the first edition of Coveo Blitz, a team used agile methodology with the help of a cooking timer. Every 30 minutes they would do a scrum. That was really impressive and worked pretty well - highly suggested!

Wrap up

We learned a lot again this year and we’ll use this added experience to prepare something awesome for Coveo Blitz 2016. We hope to see you there, well prepared! :)

I really liked the T-shirts for this year’s edition, one of the perk for participating at Coveo Blitz!

One last note, the code for Coveo Blitz 2015 solution is available on GitHub.

React + Flux & Coveo !== undefined

$
0
0

React and Flux are evolving technologies and using them with Coveo was a no brainer for me to get started on them. Here is my take on creating a searchable dashboard with those technologies.

The code of the demo is available on Github

Another JS Framework, another Day

JavaScript is an evolving language and new JavaScript frameworks are born and die everyday (if you are a purist there is always VanillaJS available for you).

As an experiment, I wanted to build an interface to Coveo’s search engine around React web application framework. While learning React, I went all-in and used Flux, a simple web application architecture popularized at the same time as React, which is somewhat different from the traditionnal MVC pattern libraries like Backbone / Marionette.

This project also got me to experiment with other technologies like SVG icons, instead of plain or font icons, and also with the new FlexBox. I also leaned towards ECMAScript 6 for this project and the new features coming in are game-changing (template string, classes, const, arrow function).

For more information about ES6 look at the new features

The dashboard

So let’s try to build a searchable dashboard from what we can get out of our sample documents put together in oursampledocumentation org.

I used the Yeoman generator generator-flux-react to bootstrap a React template application.

React

React is an interesting technology initially developped by Facebook and then released about a year ago into the wild.

It provides a virtual DOM (document object model), a JavaScript representation of the DOM which we can manipulate freely. What React does under the hood is that when a component’s render method is called, it perfoms a diff between the previous render Virtual DOM and the new one, and then only modifies the real browser DOM.

React also provides a nice extension to JavaScript called JSX which really eases the use of React. Using JSX is like using html directly into JavaScript.

Here is an example of what JSX can do:

var Nav;
// Input (JSX):
var app = <Nav color="blue" />;
// Output (JS):
var app = React.createElement(Nav, {color:"blue"});

The main elements of React are components which are somewhat like views (in the MVC pattern). They are virtual representations of DOM components with their own state, properties (which can also be event handlers) and lifecycle.

For more information about React, see their website. If you want some React help, there is a nice chrome dev tool addon. Many users have experimented with React and a lot of information is available on the web. I found this page which is a nice wrap-up of tips and tricks about React.

Flux Architecture

What better way to describe flux than what the project’s website tells us?

Flux is the application architecture that Facebook uses for building client-side web applications. It complements React’s composable view components by utilizing a unidirectional data flow. It’s more of a pattern rather than a formal framework, and you can start using Flux immediately without a lot of new code. http://facebook.github.io/flux

The notable thing about flux is the one-way flow of information, which is quite simpler than the MVC model. Of course. you can still use MVC with React, but I decided to use the whole package to form an opinion about it.

The flux architecture

The flux architecture is simple and easy to implement.

Flux architecture diagram

  • Views: (basically those are react components)
    • controller-view: The view that handles state
    • Other views: Those are more like components and gets passed parameters by properties
  • Stores: The ‘M’ in MVC,
  • Dispatcher: An event dispatcher that receives Actions and passes them to stores
  • Actions/ActionCreators: Actions are the event objects of Flux, some utility functions called ActionCreators are built to help the publishing of those events

So it works like this :

  • Stores subscribes to dispatcher and listens on certain events
  • Views subscribes to stores and update their state based on the stores state
  • Views/Stores or other things trigger actions and the flow starts, Action -> Dispatcher -> Stores -> View

The flux documentation is extensive and there are a lot of example out there to help you get started with this new architecture of building a web application.

The demo

Here are the most notable things that were built :

Stores:

  • QueryStore : Stores the query and makes the call to the Coveo Search API
  • FacetStore : Stores the different queried facets
  • ResultStore : Stores results returned
  • CategoryStore : Stores results IDs by some category (a field in the result). It is used in the CategoryResultList to display the results from a new perspective.

Components/Views:

  • App : The main application state, a view-controller in React’s terms. Subscribes to stores and updates the underlying
  • SearchField: A nice expendable searchbox (bypasses the HTML input element fixed width)
  • Stats : A simple sparkline bargraph that is built from a facet
  • CategoryResultList : A result list that displays results grouped by some field the CategoryStore helps this list.

demo screenshot

Hope you’ll like reading/seeing the code that’s out there in that demo!

The code of the demo is available on Github

Writing this article helped me understand React & Flux much more. I had to revisit the documentation, which is really helpful, and this made me see and understand what I had missed or what was still foggy from my previous visits.

The Rise of Design in a Tech Company

$
0
0

The Beginning

Coveo was founded in 2005 by a team spun off from Copernic, a search software company, to focus specifically on the enterprise search market. In the past, Coveo had a graphic/web designer but nobody to work with the developers on the product itself. The real interface design journey began in 2011, when they needed help from someone with those skills on a project for a client. Because I had worked with a Coveo employee the year before on a personal business project, he mentioned my name and they called me.

People at Coveo love trying new things, but they had never worked with an interface designer. We gave it a try with a contract to redesign Coveo Faceted Navigation. In conjunction with the product managers, we tried a lot of new approaches and designs. They found the value of having someone to do wireframes, mockups, and prototypes. Luckily for me, I was hired full time!

Evolution of the faceted navigation through the years

The Growth

Over the last three years, the company has grown very fast. Coveo needed to hire new people in every team of the enterprise (and we still need more people). They hired Eric Bouchard, a former member of Copernic, as VP of UX and Design to work alongside me. Eric was asked to consolidate the vision of the product and the website. After Eric came onboard, we built a new team to manage the website. We hired a web designer, Alexandre Drouin, that sometimes worked with me.

After some time, it seemed impossible for me to work on every design project for the product. Working with Eric, we began looking for another interface designer. We work a lot with developers, and we needed a geek (I am one myself!) who was interested in knowing how things work behind the interface because simplifying the Coveo product for users is quite a challenge. After meeting a few candidates, we found Benoit Chabert, who brought with him some skills in motion design. After he joined, we had a little more time to work on some projects initiated by the team.

Infographic by Alexandre Drouin

The Present

Time has passed, and we have refined the way our team works with R&D developers, professional services agents, and product managers. We adapt our workflow to best meet these people’s own jobs so we can deliver the best possible design for them. More technically, we have also been refining our tools and trying out various new design software, such as Sketch 3. It is in Coveo’s interest that its employees work with good tools that they enjoy, so we are free to test and try new ones.

As we have accrued more credibility within the company, we have had the freedom to create our own projects and use our own ideas to improve the products in original ways. Interface design at Coveo is a team effort, and everyone has a chance to contribute. As we create designs, we share them openly with the team (mainly R&D), try them and test them. This allows us to iterate on the designs and improve them.

The Future

Over time, the majority of Coveo’s teams and projects have become design-aware. The Professional Services team rapidly took over Benoit’s time and he works with them to integrate the product in clients’ environments. I am fully occupied by the cloud version of our product. In 2015, we want to put more effort into mobility and other cool projects that we need a designer to work on.

Because we still need more people to work with us to make Coveo a better product, we are currently looking for a new member for the UX team. We are also interested in hiring resourceful interns who want to work in interface design. We worked on a project with students from the Multimedia Design master’s degree program at Laval University in the past, and we would love to work on a project like that again.

Rating a Search Result, Customizing Search Results Ranking and Ranking Functions

$
0
0

Rating a Search Result

What is the advantage of rating a search result

Rating a search result is useful when you find that its automatic ranking in the current query is not appropriate from your point of view or that of your group. This immediately changes its position in the search results page. You or other members of your group also benefit from this corrected rating the next time the same query is performed.

It’s important that you understand the difference between “Personal appreciation” and “Collaborative rating”

Personal appreciation

Personal appreciation is a score that you, as a user, can assign to a document or item to reflect your perception of its relevance to the query. By rating a search result on a 1 to 3 yellow stars scaleFull Yellow Stars you can influence the search result ranking. The Coveo Platform uses your personal appreciation to immediately modify the ranking of a search result and to calculate its collaborative rating.

Collaborative rating

The Coveo Platform calculates collaborative rating as an average of the personal appreciations given to each document by users of the same group and uses it as one of the ranking factors. Because this process is performed independently for each user group, it adapts ranking to different types of users. Collaborative rating appears as a 1 to 3 gray starsTwo grey stars scorescore (two stars by default when nobody has ranked the search result) under each search result.

The screenshot below shows a document with a two stars collaborative rating. Under ranking weights tab, you can see that collaborative rating weight is 412 and the total weight of the document is 6834.

Collaborative rating default

If I decide to give a three yellow stars personal appreciation to the document (just by clicking on the third star), now the collaborative rating weight is 500 and the total weight of the document is now 6922.

Collaborative rating 3 yellow stars

So when I perform a “tax” query, this document will be ranked higher on my search result page compared to the search result page of the other user from my group. The reason behind that is that personal appreciation prevails on collaborative rating meaning that, once you rate a search result, its collaborative rating score is no longer taken into account.

Now If I asked to someone from the same group as mine to check the collaborative rating of the same document, it will be higher than what it was before I gave it a personal appreciation.

Collaborative rating 2 grey star

Note: You need to wait until the next update of document rating in order for your rating to take effect. If you go to CES Admin tool –> Configuration –> Schedules –> System Check the schedule of “Update Document Rating”, by default it’s once a week, but you can change it as you like.

Update Document Rating

Where should I go to create/Modify group for Collaborative rating

You can do it from in the CES Admin tool –> Index –> Ranking –> Collaborative Rating.

Modify group for Collaborative rating

Removing or modifying a personal appreciation

To delete your personal appreciation for a document, right-click on the yellow stars: The document rank is immediately adjusted according to the automatic relevance score in the search results list and the appropriate number of gray starsTwo grey stars score appears.

To modify your personal appreciation: Click the appropriate yellow star to assign your personal appreciation. For example, if the personal appreciation was three yellow starsFull Yellow Stars,click on the first yellow star and your personal appreciation will be oneOne Yellow Stars star instead of three.

Customizing Search Results Ranking

CES uses 18 ranking factors divided into 6 types to calculate the relevance score of documents. CES natively uses pre-tuned ranking weights that are likely to be satisfying most of the time. Nevertheless, fine-tuning these factors can sometimes increase accuracy, especially for specific situations. Click here for more information.

Ranking Functions

Ranking functions are like Query Functions, but the result of the computation is used to influence ranking, just like Query Ranking Expressions. The computation is done in the ranking’s first phase, meaning that all documents will have a chance to receive the ranking runction’s boosts. If NormalizeWeight is enabled, the entire value domain of the function will be taken into account to give a normalized boost ranking from 0 to 600. By enabling ranking information, it is possible to see the actual boost value provided by the functions, for each document.

For more information about ranking functions look at the Ranking function documentation

Browser strangelove

$
0
0

Post main image. Image source : Wikipedia.org

Not too long ago, a customer opened a case about the troubles he had loading an Office file from a search results page. The file was on his workstation. From his browser, he clicked on the open link to access the local file, only to get an error message. Curious about this issue, I ran a few tests on a virtual machine with indexed local files, just like the customer did on his side before opening the case.

Test one

Typing File:///C:/test/test.jpg on the address bar of IE11.

Test two

<img src=File:///C:\test\test.jpg /> in an html file loaded locally on the machine.

Test three

<img src=File:///C:\test\test.jpg /> in an html file hosted on a distant server.

Test four

<img src=File:///C:\test\test.jpg /> in an html file on a network shared folder.

While the two first tests successfully displayed the image, the last two didn’t show anything, it was like the line was not even in the html file. By opening the browser’s console, I saw, for both failed attempts, an error message saying “Not allowed to load local resource”. Interesting fact, the console was the only place where I could see any indication that there was even an attempt to load the local JPEG image. The web page did not show the classic “file unavailable” icon, there was no dialog box, and no mention on the browser’s status bar, like you could expect to see when a pop-up page is blocked. Unlike for pop-up pages, the browser won’t allow access to local files, it will just ignore the instruction.

But why?

I had to call a developer to find out more about this…

A photo of me, calling a developer. Image source : Wikipedia.org

The developer confirmed that opening a local file from the DIP is performed in a different way. “javascript:window.external.OpenDesktopConnectorUri()” is a javascript call from the Internet Explorer browser embedded in the DIP to a .NET method implemented in the DIP itself. This mechanism is not possible from a standalone browser. This call to the DIP is for working around security restrictions imposed by browsers. Those security restrictions differ from one browser to another (e.g. Chrome vs. IE), and even differ from one version of IE to another, the compatibility view settings, etc. I later found out that you could bypass the browser’s security by completely disabling the Internet Explorer Local Machine Zone Lockdown, which is like tearing down a whole wall of your house to get all the groceries inside in one trip, but that’s another story.

Slim Pickins riding a falling bomb with his classic IE logo. Image source : Wikipedia.org

Let’s just say that, in the end, if you want to make sure that all your files can be opened through a web browser without sacrificing security, you can host your documents on a cloud based solution. For any content on your local computer, the Desktop Integration Package is still your best bet.

Further reading about The desktop integration package.

Coveo Support Behind the Scenes

$
0
0

Hello everyone, my name is Eric Savoie and I am a product specialist here at Coveo since July 2014. I was the second product specialist hired to specialize in supporting our Coveo for Salesforce product. Through the months, I have come to realize that support in the cloud is very different from “conventional” support here at Coveo. For this post, I originally wanted to focus on the main differences between what we call Platform support and Cloud support but I realized that many out there would not be able to relate to those differences without an introduction to the product specialist’s reality. So here is an overview of how the communication between support and the client looks like at Coveo.

It might help some of you understand what happens between the different interactions we have through a case opened in the community. Before we start, I would like to mention that the support department at Coveo is not a call center. The reason for this is because we are selling our solution to enterprises (B2B) and not to individuals, which means that the end user will almost never contact us directly. Individual problems will be assessed by their system administrator (typically the IT department). When the system administrator is in need of support, he contacts us so we can bring in our expertise. Now, let’s start by the beginning shall we?

When a system administrator (referred to as client for the rest of this post) has a problem he cannot troubleshoot using our documentation, his best option is to open a case through our community. I feel you may already have some questions, let’s answer them right now:

Why should I open a case instead of calling directly?

Because Coveo is a very complex software platform, a product specialist will rarely be able to troubleshoot an issue on the spot. Most of the time, he will need to search through the documentation or consult an expert on a specific part of the software. Also, he will most likely need lots of additional information that cannot be easily transmitted over the phone. A case allows us to track the progress on an issue more efficiently and to use it as documentation for future problems. This is why all our efforts are concentrated on managing the community as efficiently as possible. When a client opens a case in the community, a first response will most of the time be given the same day. Also, when opening a case through the customer portal, a client will be suggested knowledge base articles as he types in the title of the case. This is made possible by using our own product and querying the index as the client types.

Case Creation Search

When is it a good idea to use the phone then?

The phone is very useful in the case of an emergency, especially when we are outside of business hours, which are between 6:00 and 18:00 EST. When calling over the phone off-hours, the client has to leave a voicemail. A best practice would be to open a case prior to calling support and to mention the case number in the voicemail. That way, the product specialist can immediately have access to the necessary information and start his investigation right away. It’s also easier to track the history of the issue through a case. When a voicemail is left, a member of the support team is immediately notified, will listen to it and contact the client as soon as possible. Again, if a case is open, a meeting invitation can be sent through it and contact with the client can be established sooner.

In case of an emergency, a client should always call our department after creating a case. That way, he can raise the flag on the particular issue that demands our immediate attention. Otherwise, the case will be treated according to the priority we assign it. Assigning priority to a case can only be done using the information contained within the case. This is why the more information we have in the description, the better we will be able to respond appropriately.

Submitting the right information

Right off the bat, here is some information that any product specialist likes to see when he is assigned a new case.

Subject: A subject should mention what the issue is about without getting into details. For example: “[NameOfTheError] when performing [ThisSpecificAction]” would be a very good subject for a new case, given the brackets are adequately replaced.

Description: A description is best based on the actual facts about what is happening at what moment rather than on anyone’s interpretation of the problem. Basically, we should have enough details in here to be able to reproduce the issue on our end. As many expressions may vary from one person to another, a screenshot is often the best way to let the product specialist know where the error occurs and what it looks like. It’s better to take all the screen and bring the attention of the reader to specific parts using basic drawing tools than to take a screenshot that is too specific and cuts away the context.

Back-End version and build number: Since many issues are corrected in each of our bi-monthly builds, it’s very likely that a client may be experiencing an issue that has been corrected in later builds. Of course, the best advice I could give any Coveo user would be to always update to the latest version. However, when we are dealing with an old build, we know it might be a good idea to see if the issue was assessed in recent builds. Knowing this information from the start can prevent a distracted product specialist from repeating an investigation that was previously made, or prevent an experienced one from having to ask the build number in his very first reply.

System level: If the issue is occurring on a test server, it will not be assigned the same priority as the one occurring on a production server. The sooner we know on what kind of server it’s occurring the sooner we can set our priorities straight and prevent any bad surprises for everyone.

Product: In the case creation page, there is a field called “Product”. This field should be filled with the product from which the issue is stemming. This information will determine to which team the case will go and will greatly affect the way we manage it. It will also allow a faster dispatch of the case to the right product specialist.

Case Product Information

New case in the console

Upon receiving a case, we dispatch it to the appropriate team within the support department. There is one team for each line of business: Coveo Enterprise Search, Coveo for Sitecore and Coveo for Salesforce/Cloud.

Some pieces of information are asked on a regular basis. The config.txt file, located in the “CES7/config” folder contains all the information about the configurations made in the Coveo Administration Tool. We must often verify this in order to determine if the issue could stem from the way Coveo is configured. The logs are also a valuable piece of information for us, they are located in the “CES7\Log” folder. They contain all the information about what operations were performed by the service (System logs), what was modified in the index (Index logs) and what was queried (Queries logs). This is why in most cases a product specialist will ask you to send certain types of logs and your configuration very early on. When we can’t figure out the cause of the issue with the Coveo logs, there may have been something caught by the Windows logs. These logs can be found in the “Event Viewer”.

"What's up doc?"

To end on a lighter note, we could easily use the analogy that we are “Coveo doctors”.

Just like a doctor will evaluate symptoms in the body and associate it with a disease or infection, we must associate the symptoms in the software with a bug or misconfiguration.

Just like a doctor may only have to prescribe a certain pill, our solution may only be to check a certain box or add a parameter. However, you want to use the right pill so, you have to be sure you found the right problem or you might end up creating another one in the end.

Just like a doctor may have to enter his patient into a long treatment, we may have to change a lot of settings, fix some bugs in the software and monitor the progression of the issue. And just like with a doctor, clients prefer solving their own problem without having to go to us.

This is something every support department should understand. The client very much prefers not having to resort to calling for your aid. Not because he doesn’t trust or is dissatisfied with the service but because he simply prefers solving his problems himself. This is why we are working on giving our customers the right tools for the right job when they need them. Using our awesome search application, we are able to query our documentation while the client types in his problem, which gives him a chance to find the right information before having to contact us.


Creating a new JS UI component in TypeScript

$
0
0

Behind the scenes, the Coveo JS UI framework is built entirely in TypeScript. Obviously, it’s intended to be customized in JavaScript, but you may want to go further and create your own component in TypeScript. Be aware that this uses the internal JS UI APIs, so it can eventually break when updating. Purpose of the post is to give a glimpse of how the components are built internally.

Huge disclaimer : I am definitely not a TypeScript expert, and I am not working in the JS UI team. It is possible that my code is not optimized. This is more to give a basic guideline :D

Huge disclaimer #2 : This article also implies that the reader has basic notions of TypeScript and the Coveo JS UI.

If you have ever downloaded the Coveo JS UI framework, you may have noticed that there’s a folder named lib in there. This folder contains the TypeScript definitions files we will need.

A component? What are we even talking about?

The JS UI is basically made of components, which are the different parts you can simply drop in your page. It goes from the facets, sorts, result lists to more advanced stuff such as the folding or analytics. On an architectural point of view, it is important to understand that a component should have a single responsability and should (at least try to) not impact others.

So, what do we want to build?

My use case was fairly simple : I wanted to create a component I called the ToggleResultList. This component would be a simple button allowing you to have different result lists in the same page (probably with a different style) and toggle between them. The main goal is to have something I can drop in my markup like this :

<spanclass="CoveoToggleResultList"data-result-list="#MainResultList"data-icon="default-result-list"></span>

Where the MainResultList is the ID of the HTML element containing the result list. Something like :

<divclass="CoveoResultList"data-wait-animation="fade"id="MainResultList"data-result-container-selector="#ResultsContainer">
  ...
</div>

For details on the options on the Result List, you can refer to the Developers documentation on the component.

The TypeScript frame

So, let’s start by building the most basic component we can.

/// <reference path="../lib/CoveoJsSearch.d.ts" />moduleCoveo.Test{exportclassToggleResultListextendsCoveo.Ui.Component{staticID='ToggleResultList';constructor(publicelement:HTMLElement,publicoptions?:any,bindings?:Coveo.Ui.ComponentBindings){super(element,ToggleResultList.ID,bindings);}}}Coveo.Ui.CoveoJQuery.registerAutoCreateComponent(Coveo.Test.ToggleResultList);

Let’s take a small breath, look out the window, and then focus on what we just wrote. For now, it doesn’t do a single thing, but the frame is there. We start by referencing the Coveo Js Search definition file, which will allow us to compile the whole thing. Then, we create our own class that extends Coveo.Ui.Component, which is the base class for any JS UI component. We then need an ID. This will get interpreted as CoveoToggleResultList in the markup, allowing anyone to drop this element in their page.

The constructor takes 3 parameters : the actual HTML element, any options that could be set on the component (we will come back to this further) and the current bindings (such as which search interface we are in). Don’t forget to call the basic constructor!

Finally, we use the framework to register the component. This line is really important, as it will indicate the JSUI to consider your block of code as an authentic component. From now on, you could compile your TypeScript code and integrate it in your page, right after CoveoJsSearch.min.js.

Be sure to check out Will’s excellent blog post on how to create a successful build process.

Adding some functionality

We have a component, it’s kinda cool! But it would been even cooler if it actually did something… Let’s add some stuff.

/// <reference path="../lib/CoveoJsSearch.d.ts" />moduleCoveo.Test{exportinterfaceToggleR1esultListOptions{resultList:HTMLElement;}exportclassToggleResultListextendsCoveo.Ui.Component{privatestaticcoveoResultListClass='.CoveoResultList';privatestaticdisabledClass='coveo-disabled';staticID='ToggleResultList';staticoptions:ToggleResultListOptions={resultList:Coveo.Ui.ComponentOptions.buildSelectorOption({defaultFunction:()=>$(ToggleResultList.coveoResultListClass).get(0)})};constructor(publicelement:HTMLElement,publicoptions?:any,bindings?:Coveo.Ui.ComponentBindings){super(element,ToggleResultList.ID,bindings);this.options=Coveo.Ui.ComponentOptions.initComponentOptions(element,ToggleResultList,options);Assert.exists(this.options.resultList);this.bind.onRoot(Coveo.Events.QueryEvents.querySuccess,(e:JQueryEventObject,args:Coveo.Events.QuerySuccessEventArgs)=>this.handleQuerySuccess(e,args));$(this.element).click(()=>this.handleClick());}privategetClassName():string{return'.'+Coveo.Ui.Component.computeCssClassNameForType(ToggleResultList.ID);}privatehandleQuerySuccess(e:JQueryEventObject,data:Coveo.Events.QuerySuccessEventArgs){if(!$(this.options.resultList).coveo().disabled&&!$(this.options.resultList).is(':visible')){$(this.options.resultList).show();}}privatehandleClick(){$(this.getClassName()).addClass(ToggleResultList.disabledClass);$(this.element).removeClass(ToggleResultList.disabledClass);$(ToggleResultList.coveoResultListClass).coveo('disable');$(ToggleResultList.coveoResultListClass).hide();$(this.options.resultList).coveo('enable');$(this.getBindings().root).coveo('executeQuery');}}}Coveo.Ui.CoveoJQuery.registerAutoCreateComponent(Coveo.Test.ToggleResultList);

As you can see, we added some options in there. Those options are interpreted as data attributes in the markup. We will then be able to associate the component to a specific result list. You may wonder why we created a static options class…

  1. It’s how the JS UI components are built.
  2. It makes them compatible with the interface editor, which would allow anyone to simply drag and drop your component in a new or existing search page. (that’s for the interface part)

In our options for now, we simply added a ResultList, which is a selector option (meaning it points to another HTML element). There’s a huge variety of options you can have, simply use the autocomplete feature in your favorite IDE to see them :D What is really important is in the constructor, we need to initialize the options, this will make the link with the component.

We then bound our component to two events : the regular jQuery click event and the JS UI’s query success event. You can refer again to the Developers documentation to learn more about these events. The click event is responsible to disabling the other result lists and then to trigger a query on the one that should be shown. ==> It is important to actually disable and not just hide other result lists, since in the case the events would stay bound on them, so it would mess with your search page state.

You may also wonder why we show the result list in the querySuccess event instead of the click one… simple : we need to make sure the query has enough time to be executed. If we were to show it right away, it would “flick” a few milli-seconds and not be enjoyable for the user.

Adding mooaaaarrrr options

So, we have a component working, isn’t this nice? If you’re really building something that other developers might use, you may want to add even more options to your component to make it really awesome.

/// <reference path="../lib/CoveoJsSearch.d.ts" />moduleCoveo.Test{exportinterfaceToggleResultListOptions{defaultResultList?:boolean;icon?:string;numberOfResults?:number;resultList:HTMLElement;}exportclassToggleResultListextendsCoveo.Ui.Component{privatestaticcoveoResultListClass='.CoveoResultList';privatestaticdisabledClass='coveo-disabled';staticID='ToggleResultList';staticoptions:ToggleResultListOptions={defaultResultList:Coveo.Ui.ComponentOptions.buildBooleanOption({defaultValue:false}),icon:Coveo.Ui.ComponentOptions.buildIconOption(),numberOfResults:Coveo.Ui.ComponentOptions.buildNumberOption({defaultValue:10}),resultList:Coveo.Ui.ComponentOptions.buildSelectorOption({defaultFunction:()=>$(ToggleResultList.coveoResultListClass).get(0)})};privateiconTemplate=\_.template("<span class='coveo-icon <%=icon%>'></span>");constructor(publicelement:HTMLElement,publicoptions?:any,bindings?:Coveo.Ui.ComponentBindings){super(element,ToggleResultList.ID,bindings);this.options=Coveo.Ui.ComponentOptions.initComponentOptions(element,ToggleResultList,options);Assert.exists(this.options.resultList);if(!this.options.defaultResultList){$(this.options.resultList).coveo('disable');$(this.options.resultList).hide();$(this.element).addClass(ToggleResultList.disabledClass);}this.bind.onRoot(Coveo.Events.QueryEvents.buildingQuery,(e:JQueryEventObject,args:Coveo.Events.BuildingQueryEventArgs)=>this.handleBuildingQuery(e,args));this.bind.onRoot(Coveo.Events.QueryEvents.querySuccess,(e:JQueryEventObject,args:Coveo.Events.QuerySuccessEventArgs)=>this.handleQuerySuccess(e,args));$(this.element).click(()=>this.handleClick());this.render();}privategetClassName():string{return'.'+Coveo.Ui.Component.computeCssClassNameForType(ToggleResultList.ID);}privatehandleBuildingQuery(e:JQueryEventObject,data:Coveo.Events.BuildingQueryEventArgs){if(!$(this.options.resultList).coveo().disabled){data.queryBuilder.numberOfResults=this.options.numberOfResults;}}privatehandleQuerySuccess(e:JQueryEventObject,data:Coveo.Events.QuerySuccessEventArgs){if(!$(this.options.resultList).coveo().disabled&&!$(this.options.resultList).is(':visible')){$(this.options.resultList).show();}}privatehandleClick(){$(this.getClassName()).addClass(ToggleResultList.disabledClass);$(this.element).removeClass(ToggleResultList.disabledClass);$(ToggleResultList.coveoResultListClass).coveo('disable');$(ToggleResultList.coveoResultListClass).hide();$(this.options.resultList).coveo('enable');$(this.getBindings().root).coveo('executeQuery');}privaterender(){varicon=this.options.icon;if(icon!=""){$(this.element).prepend(this.iconTemplate({icon:icon}));}}}}Coveo.Ui.CoveoJQuery.registerAutoCreateComponent(Coveo.Test.ToggleResultList);

You may notice there’s now 3 more options of different types.

  1. You can specify if the component is targetting the “default” result list. This means this will be the one shown by default, and the other will be hidden at the beginning (in the previous example, you would have to do it manually).
  2. You can specify the number of results of the result list. Normally, you would specify it on the whole Search Interface, but you may want to display a different number according to which result list is shown. We’re hooking on the buildingQuery event to change the number of results according to the options.
  3. You can specify an icon! Using an UnderscoreJS template, this is a simple commodity to render nicely an icon for your component.

Wrap it up!

Now, my real use case was to give the user the possibility to toggle between a “regular” view and a “tabular” view. My markup looks like this, where the TableResultList and MainResultList are two different elements containing the two different result lists templates :

<divclass="coveo-toggle-result-list-section"><spanclass="CoveoToggleResultList"data-result-list="#TableResultList"data-number-of-results="50"data-icon="table-result-list"></span><spanclass="CoveoToggleResultList"data-result-list="#MainResultList"data-default-result-list="true"data-icon="default-result-list"></span></div>

If you wonder, it is located just under the search box in a typical JS UI search page.

And the visual result looks just like this:

imageimage

Thanks a lot for reading! :D

Sandboxing JavaScript Execution in Java

$
0
0

The Query Pipeline on a Coveo index can be extended using JavaScript code running on the server. This has many benefits, but allowing arbitrary code to run in a server process opens the possibility for an admin to bring the server down in many creative ways. To protect against this we added functionality to the JS interpreter we’re using (DynJS) to prevent Bad Things from happening.

There are three ways external code running in a process can cause harm:

  • Using APIs to damage the server process or underlying server
  • Using an excessive amount of CPU
  • Allocating an excessive amount of memory

Blocking Access to APIs

At the core, JavaScript doesn’t provide any API that might be used for nefarious purposes. For example, there is no way to access the filesystem, or perform network requests. Still, JS interpreters in the Java world typically allow JS code to access any Java class present in the class path, and DynJS is no exception.

For example, JS code can use a Java object like this:

varfoo=newjava.util.ArrayList();

What we did is add a configuration option for DynJS to prevent it from exposing any Java package or object except the ones standard in JavaScript, plus any API that is explicitly exposed by the hosting application (which we assume are “safe”).

This shows how to set the option when creating a DynJS runtime object:

Configconfig=newConfig(getClass.getClassLoader());config.setSandbox(true);DynJSdynJs=newDynJS(config);

Pretty simple, right? It was simple to implement too. Here’s how it works:

if(!runtime.getConfig().isSandbox()){defineGlobalProperty("Packages",newJavaPackage(this,null),true);defineGlobalProperty("java",newJavaPackage(this,"java"),true);defineGlobalProperty("javax",newJavaPackage(this,"javax"),true);defineGlobalProperty("org",newJavaPackage(this,"org"),true);defineGlobalProperty("com",newJavaPackage(this,"com"),true);defineGlobalProperty("io",newJavaPackage(this,"io"),true);defineGlobalProperty("System",System.class,true);}

We simply prevent any public symbol from being registered that would allow code to “escape” the sandbox. Without those, it can only reference stock JavaScript APIs.

Restricting CPU and Memory Usage

Calling JavaScript code from a server process is done in a blocking manner, which means that the call only returns when the code has finished executing. If that code decides to loop forever… well it helps with the heating bill, I guess.

To address that we need a way to stop script execution if it takes too long. But even that is not enough: the JS code might sometimes block on long-running network calls, for example, so strictly checking the time taken might block legitimate operations. What we want is a way to monitor the actual CPU time used.

Turns out this is pretty easy to do. The ThreadMXBean object exposed by the JVM provides methods to check the total amount of CPU time used by a thread. By reading the value just before script execution starts and then periodically checking the value during execution, it’s possible to detect when the script code has exceeded a pre-determined CPU quota. When this happens, an exception is thrown to inform the caller of the situation.

So, how do we arrange to periodically check the CPU quota? We need to have this check performed at some place where the JavaScript interpreter must pass no matter what kind of infinite loop it’s in. In this case I’ve chosen to do that in the interpret method of BlockStatement, which is essentially when any scope like a loop or condition or function body is entered. There we call checkResourceUsage from ExecutionContext, which will relay the call if resource quotas are being enforced.

Here is how we check that the CPU quota hasn’t been exceeded:

privatevoidcheckCpuTime(){longcurrent=readCpuTime(threadId);longdelta=current-lastCpuTime;lastCpuTime=current;if(cpuTime.addAndGet(-delta)<0){thrownewExceededResourcesException("CPU usage has exceeded the allowed quota");}}

A similar technique is used to monitor heap allocations. The same ThreadMXBean object also exposes metrics about how many bytes were allocated by the current thread (including memory that is no longer referenced, but’s that OK). By checking this metric in the exact same way as for CPU, we can detect whenever the thread has exceeded the allowed memory quota and put an end to its processing.

NOTE: The call reporting memory allocation for a thread is not available on all JVMs, but works well enough on Hotspot and I expect others are implementing it as well. Trying to use memory quota on a JVM without the proper support would result in an UnsupportedOperationException.

To run JS code with quota checks, you need to run the code using the ExecutionContext returned by createResourceQuotaExecutionObject on an existing ExecutionContext. It is possible to invoke several blocks of code using the same quotas. The total consumed resources by all script executions will be used to check the quotas.

context.createResourceQuotaExecutionObject(newResourceQuota(cpuQuota,memoryQuota));

What about Nashorn?

Nashorn is the new JS interpreter bundled with Java 8. It has good performance and is certainly more robust, but I still haven’t figured out a way to implement proper CPU and memory quotas in that engine, mainly because I haven’t yet found a place where I can regularly check if quotas have been exceeded (I haven’t tried very hard though). I might write a new post when/if I succeed in that endeavour.

Trying it out

The changes we’ve made to DynJS are available publicly on GitHub. We also submitted a pull request but it hasn’t been merged yet.

DynamoDB Client Side Encryption

$
0
0

Since the June 20th 2015 release, it is possible to share custom reports with specified users. Before this release, the API calls for managing the custom reports were in the Coveo Cloud Platform API. This was mainly because the Usage Analytics service had no database other than AWS Redshift and we decided that report configurations did not belong in an analytics optimized database. We opted for the Cloud Platform database which is more configuration oriented.

As the Analytics service grows, the need for its own configuration storage began to be felt, so we decided to move the custom reports API to the UA Service and store the configuration in a new database. After an investigation, we decided to use AWS DynamoDB. Considering that this data can potentially be sensible customer information, it needs to be encrypted.

Since server side encryption is not available for DynamoDB, we had no choice but to use client-side encryption. We used a neat little library from aws-labs for this. It essentially takes care of signing and encrypting the data and is very simple to use.

Here is what the setup looks like. Note that we use AWS KMS to manage the encryption key, Guice for dependency injection and Archaius for configuration management :

 1publicclassDynamoDBextendsAbstractModule 2{ 3@Override 4protectedvoidconfigure() 5{ 6} 7 8@Provides 9@Singleton10publicstaticAmazonDynamoDBClientamazonDynamoDBClient(AWSCredentialsProvidercredentialsProvider)11{12returnnewAmazonDynamoDBClient(credentialsProvider);13}1415@Provides16@Singleton17publicstaticDynamoDBMapperdynamoDBMapper(AmazonDynamoDBClientamazonDynamoDBClient,18EncryptionMaterialsProviderencryptionMaterialProvider)19{20returnnewDynamoDBMapper(amazonDynamoDBClient,21DynamoDBMapperConfig.DEFAULT,22newAttributeEncryptor(encryptionMaterialProvider));23}2425@Provides26@Singleton27publicstaticAWSKMSawsKms(AWSCredentialsProvidercredentialsProvider)28{29returnnewAWSKMSClient(credentialsProvider);30}3132@Provides33@Singleton34publicstaticEncryptionMaterialsProviderkmsEncryptionMaterialProvider(AWSKMSawsKms,35DynamoDBConfigProviderdynamoConfigProvider)36{37returnnewDirectKmsMaterialProvider(awsKms,dynamoConfigurationProvider.getDynamoDBKmsKeyId().getValue());38}39}

It’s pretty simple to setup right?

Next, here is an example of an object that we save in dynamo and that is encrypted :

 1@DynamoDBTable(tableName="UsageAnalytics-Reports") 2publicclassReport 3{ 4privateStringid; 5privateStringdisplayName; 6privateStringaccount; 7privateReportTypetype; 8privateStringconfiguration; 9privatebooleanisPublic;10privateSet<String>filterIds=Sets.newHashSet();1112publicReport()13{14}1516@DynamoDBHashKey17@DynamoDBAutoGeneratedKey18publicStringgetId()19{20returnid;21}2223publicvoidsetId(Stringid)24{25this.id=id;26}2728@DynamoDBAttribute29publicStringgetDisplayName()30{31returndisplayName;32}3334publicvoidsetDisplayName(StringdisplayName)35{36this.displayName=displayName;37}3839@DynamoDBAttribute40@DoNotEncrypt41publicStringgetAccount()42{43returnaccount;44}4546publicvoidsetAccount(Stringaccount)47{48this.account=account;49}5051@DynamoDBMarshalling(marshallerClass=ReportTypeConverter.class)52@DoNotEncrypt53publicReportTypegetType()54{55returntype;56}5758publicvoidsetType(ReportTypetype)59{60this.type=type;61}6263@DynamoDBAttribute64publicStringgetConfiguration()65{66returnconfiguration;67}6869publicvoidsetConfiguration(Stringconfiguration)70{71this.configuration=configuration;72}7374@DynamoDBAttribute75@DoNotTouch76publicbooleanisPublic()77{78returnisPublic;79}8081publicvoidsetPublic(booleanisPublic)82{83this.isPublic=isPublic;84}8586@DynamoDBAttribute87publicSet<String>getFilterIds()88{89returnfilterIds;90}9192publicvoidsetFilterIds(Set<String>filterIds)93{94this.filterIds=filterIds;95}96}

Also pretty simple. All the job is done with the annotations from the DynamoDB data modeling lib. @DynamoDBAttribute indicates which field is persisted in the database. By default, all the attributes that are annotated with @DynamoDBAttribute will be encrypted. As you can see, some attributes can be not encrypted (I’ll explain why we need this a little bit later). They are annotated with either the @DoNotEncrypt or the @DoNotTouch annotations. The attributes with @DoNotEncrypt will be signed, but not encrypted and the ones with @DoNotTouch will be neither signed nor encrypted. If you are not familiar with the concept of signing and encrypting, I recommend you to take a look at this stackoverflow answer.

That’s pretty much it. From now on, saving an object with the DynamoDBMapper will encrypt the data before persisting it in DynamoDB.

image

Tips, limitations and traps to avoid

  • Using a setup like the one shown in this blog post will require an unlimited key strength. This is configured in the jvm. Here is a stackoverflow answer explaining how to do it.
  • Remember when I said wanted some data to not be encrypted? Here’s why: scan operations do not work on encrypted fields. This means it’s only possible to fetch by ID or by a scan operation on a non encrypted field. For us, it is acceptable that some fields are not encrypted. They do not contain sensible information and allow us to perform smarter retrieval of the data.
  • It is possible to back up and restore your encrypted data, as long as the encryption metadada is backed up and restored along with it. For big dynamoDB tables, you can use AWS Data Pipeline. Since our tables are relatively small and data pipeline can be expensive (it uses AWS EMR and must spawn ec2 instances), we use this script in a cron job.
  • I haven’t tried it yet, but according to AWS support, KMS key rotation is supported by the aws-dynamodb-encryption lib.

More Hackathons at Coveo

$
0
0

We should really try this new technology…

It would be really cool if we could integrate these two components…

I’ve got a new idea on how we could solve this problem…

… but I don’t have time to do it.

How often do you hear this sort of statement? At Coveo, we hear it every week. Not because we’re overworked, not because we do not take the time to do things correctly. We hear this simply because we have a lot of ideas.

We’re pretty enthusiastic when it comes to creating software. Sadly, due to the nature of software development and the rate at which new technologies are released, we do not always have the time to play with everything we’d like to.

So we introduced Hackathons

In order to force people to free their schedule and give their ideas a try, we’ve started doing Hackathons at Coveo. Everyone is free from their usual schedule for one afternoon followed by one full day during which everyone can work on … whatever, really!

There are only two rules:

  1. You are not allowed to work on something that you’d normally be working during a standard work week.
  2. You must have a demo at the end of the Hackathon. No exceptions.

So we’ve been doing this for the better part of 2015 now and the event is still a huge success! We try to host a Hackathon once every 3 months and we’re currently working on our 4th edition.

Some sample projects made during Hackathons

  • Creating a mobile-friendly version of our cloud administration application.
  • Integrating a world map component into our search results with geolocation.
  • Using Spark and usage analytics data to influence the index using machine learning.
  • A web service where Coveo connectors can be easily configured online and tested.
  • A smart search box with advanced syntax suggestions and highlights.
  • SlackLine, a web-based Slack client that can be easily integrated within web apps for self service.

Outcome

As you can see from this (very small!) sample, the scope of our Hackathon projects is very broad. A lot of these projects were eventually merged into the product as very real features. Some even gave birth to completely new products!
Another positive side effect is that this creates an environment where people that wouldn’t normally work together can collaborate on something cool that they care about.

Hackathons are here at Coveo and they’re here to stay. Everyone loves the event, from the developers to the management team. Here’s hoping that they keep getting bigger.

Who knows, maybe one day we’ll have a Hack Week!

Troubleshooting memory issues with CESService7

$
0
0

Sometimes CES Service has memory issues and developping a way to fix memory issues with it was way needed.

By default, CES Service 7 should not use more than 50% of the RAM. This way, CES won’t monopolize all the available resources. However, sometimes the CES service is going to take more than 50% of the total RAM. The best way to find out why the service has this behavior is to create dump files.

There is an easy way to do that with Windows Server 2003, using User Mode Process Dumper 8.1, but this software doesn’t work on more recent versions of the Windows, that is Windows server 2008 and Windows server 2012.

So, basically, my goal was to find a way to replicate what User Mode Process Dumper is doing on the newer versions of Windows Server: Create an automatic process to monitor the CES service memory usage, and then create multiple dump files when the RAM used by CES service is spiking over 50%. To avoid multiple problems, I also added the option to automatically close CES service when this situation happens

ProcDump

image

ProcDump is a free software who allows you to create dump files directly from the command line.

Let’s take this example

c:\procdump.exe -c 80 -s 5 -n 3 CESService7.exe c:\procdumps

ProcDump is going to create multiple dump files, three in this case (-n 3), with 5 seconds intervals (-s 5) when the program (CESService7.exe) is using more than 80% of CPU (-c 80). The dump files will be created in the folder prodcumps (c:\procdumps).

Unfortunately, there is no options to kill the program after creating the dump files. This can be a problem, because the server can become very slow and experience performance issues. Using Windows monitoring tool on the RAM we can automatically start a script that will start ProcDump and terminate the program in fault (CES Service).

Performance Monitor and Task Scheduler

First, the Performance monitor, perfmon.exe is built-in Windows 8. It will allows you to monitor the memory usage of a software. We need to create a monitor that will trigger an action when more than 50% of memory is used by CES service. To set this properly we will set the limit at n/2 + 500 MB. n represent the amount of RAM available. If we have 16GB of RAM, the limit will be 8.5gb. The 500 MB buffer is optional, but it will allow CES service to continue running if there is a minor glitch in the memory usage. For more accurate results, you could decrease this value to 50 MB depending on your final purpose.

We then need to trigger an event when CESService uses more than 8.5 GB of RAM out of 16GB. Using the task scheduler we can trigger this alarm.

Task Scheduler

The task Scheduler can be found under the administrative tools. It is used with Performance Monitor in order to trigger actions depending on settings we previously created. In our case, we need to create an alarm that will open a .bat file. This script can be found here .

This script is going to run as an administrator and execute ProcDump if you choose to run the alarm with the highest privileges. After the dump files are created, CES Service will be forced to quit.

In pseudo code, it would look like this:

Performance monitor running in background
If memory used by CES service spikes over limit:
  Trigger the alert created in Task Scheduler
If triggered:
  RUN ScripDumpFiles.bat
  Create Dump Files for CESCrawlers.exe, CESConverters.EXE, CesService.exe
Force to quit CESService

Mail Alert

You can also configure an email alert when this happens by adding this line in the file:

bat CALL blat -to user@example.com -server smtp.example.com -f sender@example.com -subject "subject" -body "body"

It is also possible to send an e-mail directly from the task scheduler, but apparently there is an unfixed bug with Windows 8 that won’t allow an e-mail to be sent.

image

Managing CPU usage

From the task manager, it is possible to restrain the CPU usage for a program. We can choose which processors are allowed to run a program. If there are, let’s say, 8 CPUs available, we could allow processors 1 to 5 to be used by a program. The program will only use 5/8 of the resources available.

image

Conclusion

Hope this will help people having a better experience at fixing memory issues. If you’re the absolute geek, you can even monitor every program running on your computer!

ps. This article on developers.coveo.com explains the procedure in a more detailed way.

Dreamforce Session Explorer - The story behind the app

$
0
0

As some of you guys may know, Dreamforce is one of the biggest event in the enterprise software industry. For the #DF15 edition, we wanted to do a little something different than what we had done previously.

We wanted to create something by combining marketing and R&D efforts. There were a few simple rules to follow:

  • Be able to create something in about 1.5 months or less.
  • Do not replicate/copy Salesforce’s Dreamforce app - complement it
  • Try some new technology or frameworks
  • Showcase Coveo’s capabilities but be distant enough of Coveo for Salesforce
  • Be awesome
  • Have fun

The project was also intended to be a huge hackathon on evenings and weekends… it ended up being a lot more.

The Design

Our timeframe was really restricted! We had to think of how to build something awesome really quickly. Numerous ideas were thrown on the table of what the app could be : should we leverage the Dreamforce agenda? Be more social-oriented? Make a party app? At some point, we even thought about creating a real-time social media aggregator on top of Dreamforce… Let’s say the discussions were flowing!

Leveraging attendees’ own custom agenda (through their Salesforce credentials) would have been really cool, but it would have implied authentication to Salesforce which we just didn’t have time to build. We also explored the Dreamforce website to see what was available at that point. We then decided to do what Coveo has the capability to do: create relationships between data you wouldn’t even think exist. By leveraging Dreamforce’s sessions, themes and speakers, we could associate them with external related content such as Twitter, LinkedIn, SlideShare etc. The idea was born!

Quickly, our power UX team came with an original idea : everything would be hexagonal-oriented. (Nothing to make a developer’s life easy…) We had to make a lot of iterations on mockups to have something that would satisfy everyone. You can see that from the first iteration from the actual result… it changed a bit.

imageimageimageimage

Techno techno techno

Lots of questions to ask here : Is it client-side only or do we want a back-end as well? Which language? Should it be a native app for mobiles? Which framework?

At Coveo, we have our own Javascript UI Framework (JS UI to make it short) that enables people to easily create custom search pages. Problem is, it comes with a whole lot of functionalities that we did not need in our app, the app concept is really different from what we usually do. Quickly enough, we stripped out what we call the Search Endpoint (module who’s responsibility is to build and execute queries on the Coveo Cloud platform) from the JS UI to make our app as light as possible. Obviously, we were not going to write everything in pure JavaScript without any external help… so came the important time to choose a JS framework to build on top of it. We explored a few things here and there (and also invoked the possibility to do it in TypeScript just like our actual Coveo frameworks)… and decided to use the most trending, buzzwordy, “à la mode” javascript framework of the week… React.

React comes with a really different architecture traditional developers are not used to. We also added the classic tools to make the development easier such as gulp and webpack… and quickly added react-router in the project to manage our URLs. Some parts of the app were well suited for React, such as session details (including related/external content)… but others such as the complete honeycomb view were more… let’s say tricky.

We tried to respect the React architecture and split into as many components as possible, respecting the fact that we did this as a hackathon. For instance, in the Hexagon Details page, you can find components for :

  • The application container
  • Hexagonal header
  • Session/Keynote excerpts
  • Result list and result list items
  • A variety of templates for each different kind of content

It would have been really fun to do it in TypeScript instead of JavaScript, but with our early experiences, it felt like the React/Typescript integration was not mature enough to build something without doing some hacks on Typescript itself (this github issue covers most of it).

Connectors!

When you need search, you obviously need one/some/a thousand connectors behind to feed the index some data. When we started, we had a plan for the following sources :

  • Dreamforce website
  • Chatter
  • Twitter
  • LinkedIn
  • SlideShare
  • YouTube

The Dreamforce website was entirely crawled using web scraping. We are simply getting the pages and extracting the information we want from the HTML. We were lucky enough that the Dreamforce website was available early (and that the html structure did not change). We’ve been able to quickly adjust to the data, then enrich it with location and dates of the sessions when they were published at the beginning of August.

For the remaining sources… it was like tossing a coin and hoping it to fall on the good side. YouTube was essentially a freebie since we have a productized connector for it. The same thing applies for the Twitter crawling. For SlideShare, we had to develop a new connector, which is quite simple but powerful. We simply have to specify which accounts we want to crawl. Then… LinkedIn and Salesforce Chatter gave us some problems. The API restrictions on LinkedIn did not allow us to store data… while Chatter did not give interesting results. Sooo, as every software project, we had to adjust and then decided to drop LinkedIn and add Facebook groups in the loop (which is a custom connector, again). We then, finally, added Instagram since everybody enjoys seeing pictures of food and beaches while being at Dreamforce. The Instagram crawling is kinda unique since it uses the location of Dreamforce to crawl every post that is made from a nearby location.

Hexagons

Thankfully, building an infinite horizontal scrolling view made only of hexagons was a piece of cake… NOT. Ohh, and that infinite horizontal view needs to be awesomely fast on mobile. There were a few challenges and a few iterations were needed before we got to something smooth enough and acceptable.

The biggest challenge with the scrolling timeline was that we couldn’t preload all the hexagons because it would have generated too much DOM and would have been as responsive as an airplane multimedia system. To overcome that, we had to dynamically inject and remove the hexagon as the user scrolls to keep the DOM as small as possible while keeping a virtual space representing the hexagon to-be-injected space.

This led to some magnificent pieces of code like this:

varsmallWindow=630;varso******SmallWindow=550;varhexagonSize=[Math.ceil(120*1.08),Math.ceil(140*1.16),Math.ceil(170*1.08)];varnbEvents=this.props.events.length+(this.props.first?1:0)+(this.props.events.length>10?(Math.ceil(this.props.events.length/10)-1):0);varwidth=hexagonSize[this.props.hexaSize]*(Math.ceil(nbEvents/3)+(nbEvents%3!=1?0.5:0));

Basically, this code is responsible for measuring the size of the hexagons. We needed to round the number up since we haven’t mastered the pixel split yet.

Everything is mobile-friendly

At some point, we decided that it would be cool to have something on the App/Play Stores. Reproducing the app for iOS and Android was just unrealistic, so we decided to go with a Webview approach. We had some experience with Phonegap but we weren’t convinced that it was the way to go since it comes with a lot of feature that we didn’t need in the end. We decided to create our own simple webview apps instead.

iOS

Dreamforce was all about trying new technologies so we decided to implement the iOS app in swift. We implemented a UIWebView and added some logic to open external links outside the app. The code is pretty simple and is available here.

Android

Android app has a little more code because we wanted to support the integrated back button of Android devices. It means that some WebView options need to be enabled like JavaScript and LocalStorage. The code is also available here.

As you can see, the iOS and Android specific code is really small and this technique allowed us to have a single codebase apart of these two snippets. It also enables us to update the app easily without having to submit the app through the App Store review process that can take a couple of days.

What we learned/What can be reusable

Overall, we really enjoyed our experience. We developed an expertise in React and really liked it, and would probably like to reuse it on a new project or even maybe in the next generation of our JS UI framework or our cloud administration interface, who knows? We also developed a bunch of new connectors that, with a bit more work and features, could be integrated into the Coveo offering.

It was a really intense project, which ended in a really nice app we’re proud of. It’s obviously not perfect and we dropped some features along the way (such as implementing the desktop mockups, adding some facets etc.), but we’re proud of the result and really hope the Dreamforce crowd will enjoy it. It also offers us an app template that we could maybe reuse for some other events!

Don’t forget to go download the app, and huge thanks for everyone that contributed in the app!

Coveo JavaScript UI for Newcomers

$
0
0

The new Coveo JS UI has been available for a while now. How about getting off to the right start? Well you’re at the right place, here is a tutorial on how to configure and use the new Coveo JS UI.

Step # 1: Installing the Coveo Search API

The Coveo Platform 7 comes with the Coveo Search API, a web service offering a REST interface that is used by other Coveo products such as the Coveo JavaScript Search interfaces to send query and receive search results from a Coveo unified index. The Coveo Search API REST endpoint can also be used by custom applications (see REST Search API Home).

Coveo Rest Basic Diagram

As shown in the following diagram, the Coveo Search API acts as is a bridge between the front-end search interfaces or applications and a Coveo Enterprise Search (CES) instance maintaining a unified index on the back-end. You can install the Coveo Search API on a server of your choice such as on the Coveo Master server (where Coveo Enterprise Search is installed), on a front-end server (where the Coveo JavaScript Search search is served from), or any other server. Once installed, the Coveo Search API runs as a Windows service.

When your deployment includes one or more Coveo JavaScript Search interfaces, you must install and configure a Coveo Search API.

Follow the instructions described here in order to install the Coveo Search API. Then you’ll be asked to customize and start the Coveo Search API.

Here is an example of a working “config.yml” file:

Config YML Example

Once you started the “Coveo Search API” service, you can validate that the service is accessible from various computers:

a.	Using a browser, access the URL in the following format:

"http://[REST_API_SERVER]:[port]/rest/search"
![Rest URL Example](/images/JSUI101/RestURLExample.png)

b.	Validate that the REST API JSON response appears in the browser
![Rest API JSON](/images/JSUI101/RestAPIJSON.png)

Step # 2: Creating the JS UI search page

Now that your Coveo Search API is well configured and up and running, you can now create your Coveo search interface in JavaScript.

1.	Using a browser, access the URL in the following format: "http://[REST_API_SERVER]:[port]"
![Coveo JS Landing Page](/images/JSUI101/CoveoJSLandingPage.png)

2.	Click on "CLICK HERE TO START"
![Coveo JS Authentication](/images/JSUI101/CoveoJSAuthentication.png)

3.	Type your username and password, then click on connect, you’ll get the message below:
![Coveo JS Loading](/images/JSUI101/CoveoJSLoading.png)

4.	On the “CREATE A SEARCH PAGE” window, you can click on “CREATE PAGE” if you just want to only use the “All Content” search interface, or you can click on “MORE TABS” in order to add more search interfaces.
![Create A Search Page](/images/JSUI101/CreateASearchPage.png)

•	By clicking on “MORE TABS”, you’ll see the out of the box search interfaces available
![Available Search Interfaces](/images/JSUI101/AvailableSearchInterfaces.png)

•	Click on the ones that you want to add into your search page. As an example, let’s click on "People", "Email" and "SharePoint"
![Selected Interfaces](/images/JSUI101/SelectedInterfaces.png)

5.	Click on “CREATE PAGE”, you’ll get the message below:
![Creating](/images/JSUI101/Creating.png)

Here is your Coveo JavaScript search page:
![Search Page Final](/images/JSUI101/SearchPageFinal.png)

You are good to go! But do not stop there, there is so much more to do with it! [Start here] (https://developers.coveo.com/display/public/JsSearchV1/JavaScript+Search+Framework+V1+Home)


Using React JSX with TypeScript

$
0
0

In the last months, we experienced with React and we enjoyed it a lot. As you may know, all Coveo’s web applications are built using TypeScript, so with the release of TypeScript 1.6 announcing support for React JSX syntax, we were stoked!

In this article, I’ll introduce you on how to start a new project using TypeScript, JSX and React and show you some tools we use to simplify our development.

Initial setup with npm

First we’ll setup our project with npm init. For this project we need node, typescript, tsd, and react. Let’s install them:

npminstalltypescript-gnpminstalltsd-gnpminstallreact--save

Second, let’s make sure we have TypeScript compiler 1.6 or later:

tsc--version

You should see an output similar to:

messageTS6029:Version1.6.2

TypeScript definitions with tsd

We’re almost ready to start coding, but we’ll need the React definitions. We already installed tsd which is a package manager to search and install TypeScript definition files directly from the community driven DefinitelyTyped repository. DefinitelyTyped is a great project and we try to contribute as much as we can. It will allow us to download the latest definitions for React and other libraries. Like we did with npm, we need to initialize a tsd project by running :

tsdinit

This will create a tsd.json file (similar to a package.json but refering to our TypeScript definitions), a typings/ folder to store the definitions and a tsd.d.ts referencing all our downloaded definitions.

We can now install the needed definitions:

tsdinstallreact-global--save

This downloads the definitions to our typings folder, saves the commit hash to the tsd.json and updates the tsd.d.ts.

Our tsd.json should contain something like :

"installed":{"react/react.d.ts":{"commit":"16134c168d021351acb1673ee9659644fc58c424"},{//....}

And the tsd.d.ts should contain:

/// <reference path="react/react-dom.d.ts" />/// <reference path="react/react.d.ts" />/// <reference path="react/react-addons-create-fragment.d.ts" />/// <reference path="react/react-addons-css-transition-group.d.ts" />/// <reference path="react/react-addons-linked-state-mixin.d.ts" />/// <reference path="react/react-addons-perf.d.ts" />/// <reference path="react/react-addons-pure-render-mixin.d.ts" />/// <reference path="react/react-addons-test-utils.d.ts" />/// <reference path="react/react-addons-transition-group.d.ts" />/// <reference path="react/react-addons-update.d.ts" />/// <reference path="react/react-global.d.ts" />

Let’s code

Create a file named HelloWorld.tsx. Notice the .tsx extension, this is needed for TypeScript to enable JSX syntax support.

/// <reference path="./typings/tsd.d.ts" />classHelloWorldextendsReact.Component<any,any>{render(){return<div>Helloworld!</div>}}

We first reference to our TypeScript definitions that we setup in the previous step. We then import React module using the ES6 module import syntax and then, we declare our first component using react!

Compiling to JavaScript

TypeScript 1.6 has a new flag to enable JSX support, we need to enable it. Compile HelloWorld.tsx to JS by running: tsc --jsx react --module commonjs HelloWorld.tsx

This will produce HelloWorld.js

But, you might not want to remember all those flags, let’s save our compiler configuration to a tsconfing.json. The tsconfig.json file specifies the root files and the compiler options required to compile the project. For more details refer to the official documentation.

{"compilerOptions":{"jsx":"react","module":"commonjs","noImplicitAny":false,"removeComments":true,"preserveConstEnums":true,"outDir":"dist","sourceMap":true,"target":"ES5"},"files":["HelloWorld.tsx"]}

We can now run tsc in our project folder to produce the same result.

Finishing touches

Let’s explore a little deeper on how to render our HelloWorld component and pass typed props.

Let’s improve our HelloWorld component by adding firstname and lastname props and typing them with an interface. Then, let’s render it! This will allow us to be notified at compile time if a prop is missing or is the wrong type!

/// <reference path="./typings/tsd.d.ts" />classHelloWorldProps{publicfirstname:string;publiclastname:string;}classHelloWorldextendsReact.Component<HelloWorldProps,any>{render(){return<div>Hello{this.props.firstname}{this.props.lastname}!</div>}}React.render(<HelloWorldfirstname="John"lastname="Smith"/>,document.getElementById('app'));

Compile once again with tsc. Then let’s finish by importing everything in an index.html file:

<!DOCTYPE html><html><head><metacharset="utf-8"><title>React TypeScript Demo</title></head><body><divid="app"></div><script src="https://cdnjs.cloudflare.com/ajax/libs/react/0.14.3/react.js"></script><script src="https://cdnjs.cloudflare.com/ajax/libs/react/0.14.3/react-dom.js"></script><script src="HelloWorld.js"></script></body></html>

Open index.html in your browser and you should see Hello John Smith!

That’s it! You’ve created your first TypeScript React project. Hope you enjoy developing with it as much as we do!

Note that i’ve intentionally left webpack out of this tutorial to keep it short but as your project grows to more than one file, a module loader will be necessary.

Opening a Sitecore Dialog from a Bookmarklet

$
0
0

When developing dialogs, wizards and applications in Sitecore, a developer would have to open them many times per day. When the action to open them requires more than one click, a lot of time will be lost.

Wouldn’t it be nice if one could open a dialog from the browser console command line or a bookmark?

With a bit of developer tools inspection, it is easy to find that Sitecore uses JavaScript to open the dialogs.

onclick="javascript:return scForm.postEvent(this, event, 'AnEventName')"

The event name can be any Sitecore command like indexing:runmanager to open the Sitecore Indexing Manager. The code also uses this and the user event to feed the scForm.postEvent function. In a bookmarklet, no user event will be available so it needs to be faked by a { type: 'click' } object.

Put together, this code can be set as a browser bookmark to send a command to Sitecore in most of the cases:

javascript:scForm.postEvent(this,{type:'click'},'YourEventName')

The only exception is the Sitecore 8 control panel. The postEvent function reloads the page when called in a SPEAK page. Instead, the speakPostEvent function can be used but it has different parameters. Its user event needs to have a preventDefault function defined to avoid the page to reload.

javascript:scForm.speakPostEvent(scForm,{type:'click',preventDefault:function(){}},'YourEventName')

With feature detection, a universal bookmarklet code can be crafted.

javascript:vareventName='YourEventName';varuserEvent={type:'click',preventDefault:function(){}};if(scForm.speakPostEvent){scForm.speakPostEvent(scForm,userEvent,eventName);}else{scForm.postEvent(this,userEvent,eventName);}

image

This code can even be used in the excellent Sitecore Developer Tool Google Chrome extension to open dialogs from any Sitecore administration page.

Blitz - The story behind this year’s challenge

$
0
0

This year was the sixth edition of Coveo Blitz, our classic programming contest for students. The original purpose of the event is to find great, passionate developers and show them how fun, passionate, and driven our team is. We had the idea to step out of our comfort zone this year and focus on what we’ve learned in the last editions.

The brainstorm

We’ve wanted to do a challenge involving artificial intelligence for a long time. With a smaller team working on Blitz this year, we had to leverage existing projects to make it on time. We already knew Scalatron, Berlin AI, but our search allowed us to find a bunch of interesting projects, including Vindinium, which turned out to be most compelling one. It covered most of our requirements: it was open source, customizable, worked with most programming languages and had many available starter kits.

image

Changes to Vindinium

Vindinium out of the box was a great skeleton for our contest. However, it was missing some features in order to be Blitz ready. First, the way bots usually start Vindinium matches is by joining a queue. As soon as 4 bots are ready, the match starts. This was not an acceptable solution for us, as we needed to have a tournament bracket and we didn’t want participants to join a match that they weren’t supposed to. In order to do that, we added API calls to list, create, join, delete and start games. We also added an administrator API key that was required to invoke these calls so meddling students wouldn’t create games. This allowed us to create games, send the game id to the appropriate teams, let them join and start the game at our leisure. We even added a Slack integration to our UI that would automatically send an invite with the game id to teams whenever a game they were expected to join was created.

Another thing we wanted to do was to prevent open source Vindinium bots from working. This ensured that lazy students wouldn’t simply copy a Github project, and thus dominate all other teams. Consequently, we modified most constants such as the cost of visiting a tavern, the life provided by a tavern and the damage done by hero’s hits. We also added spikes, a new type of tile. Spikes can be passed through just like air but they deal damage to your hero.

These changes allowed us to easily manage the Vindinium server (through our custom UI) and created a fun and diverse environment for the participants. Spikes added a surprisingly nice complexity to the game and led to some interesting pathfinding strategies.

We also learned a lot while coding the challenge, this year we tackled with Scala, Akka, MongoDB, AWS, NodeJS, React and TypeScript.

image

The contenders

This year we made a roll call to our amazing colleagues to see if they were interested in also participating to Blitz. Needless to say, it took about 10 minutes to build two complete teams. We made sure the Coveo teams didn’t know about the challenge. They needed to be good, they represent Coveo! Luckily for us, the two Coveo teams finished first and second. Congrats to Brute Force It (Alexandre, Frédéric, Vincent, Pierre-Alexandre) and WOW BLITZ AWSOME (Mathieu, Charles, Denis, Jean-Philippe).

image

The winners

Since the first and second places were taken by the Coveo teams (which couldn’t win the prizes), team Comeo (François Chantal, Olivier Précourt et Samuel Thériault-Hall) got first prize and each member won a GoPro. Team int elligence; (Guillaume Chevalier, Nicolas Tremblay, Raphaël Gaudreault et Jean-Benoît Harvey) each member got a Best Buy gift card for its second position. Kudos to those two teams!

image

Wrap up

We finished the day by having each team explaining the algorithms used to solve the challenge, grabbed a cold beer and a slice of pizza and discussed with students. We’ve listed some solutions on the Coveo Blitz 2016 GitHub account. Send us your solution if yours isn’t listed! Also, be sure to check out the Vindinium subreddit for great AI solutions.

We hope you’ve enjoyed your day as much as we did and hope to see you next year for another awesome challenge. Be sure to take a look at the video, the photo album by Nick Pelletier and read more about past challenges.

Template-ish method pattern using java 8

$
0
0

In the Usage Analytics service, there is a layer that validates if a user is allowed to perform the requested action. This should not be a surprise for anybody as all applications have some kind of security or permission check somewhere. Since the UA service is built in a layer architecture, that’s the job of the permission layer. The code is pretty boilerplate and very similar for all the different calls. It follows this logic :

  • Extract user identity and account from token
  • Check if the user has the required permissions
    • If he does, call the service layer
    • If he doesn’t, throw an exception

This rang a bell in my head. Surely, there’s a design pattern that could help make this code more straightforward and with less duplication. The pattern that seemed the best fit was the template method pattern. It is a well known design pattern that can sometimes have a pretty big drawback : with many different implementations come many classes (and it can sometimes be a pain to maintain that many classes). I decided to use some of the goodies that came with Java 8 to solve this problem.

Here is what it looks like :

publicclassUserServiceWithToken{privateUserServiceuserService;privateTokenCacheWrappertokenCacheWrapper;privateTokenServicetokenService;privatePermissionsServicepermissionService;@InjectpublicUserServiceWithToken(UserServiceuserService,TokenCacheWrappertokenCacheWrapper,TokenServicetokenService,PermissionsServicepermissionService){this.userService=userService;this.tokenCacheWrapper=tokenCacheWrapper;this.tokenService=tokenService;this.permissionService=permissionService;}publicSet<Report>getReportsByUser(Stringtoken,StringuserId,Optional<String>org)throwsUsageAnalyticsException{returnexecuteIfAuthorized(org,tokenCacheWrapper.getTokenInfo(token),account->userService.getReportsByUser(account,userId),Permissions.VIEW_REPORTS);}publicvoidsetAllowedReportsOnUser(Stringtoken,Stringid,Set<String>reports,Optional<String>org)throwsUsageAnalyticsException{executeIfAuthorized(org,tokenCacheWrapper.getTokenInfo(token),Functions.consumerToFunction(account->userService.setReportsOnUser(account,id,reports)),Permissions.EDIT_REPORTS);}private<T>TexecuteIfAuthorized(Optional<String>org,TokenInfotokenInfo,FunctionE1<String,T,UsageAnalyticsException>executer,Permission...permissions)throwsUsageAnalyticsException{Stringaccount=tokenService.extractAccount(tokenInfo,org);for(Permissionpermission:permissions){permissionService.throwIfDoesNotHavePermission(tokenInfo,account,permission);}returnexecuter.apply(org.orElse(account));}}

And here is the little consumerToFunction trick I used to only have one executeIfAuthorized method :

1publicstatic<T>Function<T,Void>consumerToFunction(Consumer<T>consumer)2{3returnx->{4consumer.accept(x);5returnnull;6};7}

I could have used AOP (Aspect Oriented Programming) to implement a similar solution, similar in the way that it would have achieved the same goals :cleaner code and less code duplication. I chose the template method pattern because I think AOP was overkill for what I was trying to do, like killing a fly with a rocket launcher. Although AOP has its advantages, it would have required more refactoring and the introduction of a new AOP framework. Also, the team is not used to work with AOP. Those familiar with the template method design pattern will recognize that the code above is not exactly an implementation of this pattern, but all in all, I like the result. The implementation is concise, easy to read and adding a new method in the permission layer is very easy. As a bonus, it does not affect the testability of the code as it is fairly easy to mock and unit test.

Typescript Dependency Injection and Decorators

$
0
0

In July 2015, Microsoft announced the release of Typescript 1.5, introducing decorators, based on the ES7 decorator proposal. I had to test it!

It should be noted that decorators are still in stage 1 proposal and their actual implementation could change anytime

This article will demonstrate the possibility of using decorators to do dependency injection in Typescript.

Why use injection?

  1. Injection avoids the pollution of the global namespace with object instances.

  2. It provides an easy way to share an object instance across our application, without the need to pass the object everywhere.

    In our constantly growing Single Page Application, we have some objects that are constants through a user visit. E.g., the visitor’s browser and the logged User. The first offers us some utility methods like browser.isMobile() or browser.isIE(). The second which contains a set of permissions, email, etc., is used, among other things, to determine which panels the user can access.

  3. The injected object is always up-to-date.

    We use Backbone to periodically refresh our models with the state from the server. Our injector allows us to create the instance once and use it where we need it.

Implementation

I made a simple project on GitHub that provides the Injector and decorator. Feel free to contribute!

It’s also available on npm: npm install dose.

It uses a small registry that stores values in a map. There’s a lot to improve in there, but it met my requirements.

exportdefaultclassInjector{privatestaticregistry:{[key:string]:any}={};staticgetRegistered(key:string):any{varregistered=Injector.registry[key];if(registered){returnregistered;}else{thrownewError(`Error:${key}wasnotregistered.`);}}staticregister(key:string,value:any){varregistered=Injector.registry[key];if(registered){thrownewError(`Error:${key}isalreadyregistered.`);}Injector.registry[key]=value;}}

The Injector can now be used like this:

/* FileA.ts */importUserfrom'User';importInjectorfrom'Injector';/* Register the User */letinstance=newUser('John','Smith',25);Injector.register('user',instance);/* Register Application Settings */letsettings={DEBUG:false};Injector.register('settings',settings);
/* FileB.ts */importInjectorfrom'Injector';functiontest(){letuser=<User>Injector.getRegistered('user');console.log(user.name);}test();

It works and it’s far from magic. We must cast the registered value in User because getRegistered returns an object of type any.

Enters the decorator

First, let’s look at the simpler injector:

functioninjectProperty(...keys:string[]){return(target:any,property:string)=>{target[property]=Injector.getRegistered(keys[0]);};}

In this code, target is the object instance on which we want to inject and key is the property. Let’s see the usage:

classUserConsumer{@inject('user')privateuser:User;}

target => UserConsumer

property => user

keys[0] => ‘user’

The injectorMethod does about the same but accept 1…N keys instead of one.

classUserConsumer{@injectorMethod('user','settings')getUserAge(offset:number,user?:User,settings?:any){if(settings.DEBUG){console.log('Getting user age');}returnoffset+user.age;}}

Note that it adds parameters to the methods. I have yet to make it work directly in the method parameters

Nice! But we can do better. We don’t want to have a decorator for the method and another for the property. Let’s wrap them with a small function that detects the type, so we can use @inject('key') on both methods and parameters

exportfunctioninject(...keys:string[]){return(...args:any[])=>{varparams=[];for(vari=0;i<args.length;i++){args[i]?params.push(args[i]):null;}switch(params.length){case2:returninjectProperty(keys[0]).apply(this,args);case3:returninjectMethod(...keys).apply(this,args);default:thrownewError("Decorators are not valid here!");}};}

Here’s the complete UserConsumer code. A small demo project is available on GitHub.

import{inject}from'../node_modules/dose/dist/Dose';importUserfrom'./User';importInjectableKeysfrom'./InjectableKeys';exportdefaultclassUserConsumer{@inject(InjectableKeys.User)privateuser:User;@inject(InjectableKeys.Settings)privatesettings:{DEBUG:boolean};@inject(InjectableKeys.User,InjectableKeys.Settings)getUserAge(user?:User,settings?:{DEBUG:boolean}){if(settings.DEBUG){console.log('Getting user age');}returnuser.age;}getUserName(){console.log(this.settings);if(this.settings.DEBUG){console.log('Getting user name');}returnthis.user.name;}}

The official Typescript decorator page has a lot more information on what is possible with the decorators.

Try it

Create a npm projet that depends on dose & Typescript >= 1.5. Then you can run npm install to download the dependencies.

Import the injector & the inject decorator and you are all set!

Be sure to pass the –experimentalDecorators flag to your typescript compiler

That’s it!

Viewing all 202 articles
Browse latest View live